How to install Drupal 8 like a superhero
This is the first chapter of Drupal 8 Theming: Getting Started, a new series in which you will go into the basics to begin developing your own themes for this Content Management System.
Getting Started
In order to install Drupal 8, your computer must meet a few technical requirements which are similar to those in Drupal 7. First, you need what is called an AMP stack, that is, Apache + MySQL + PHP. Apache is a Web Server. You need one because Drupal is built on PHP, which is a server-side language. By the way, Drupal 8 requires PHP 5.5.9 or later with the CURL extension to work. MySQL is a Database Server. If you don't provide Drupal with a database, it will not be able to do anything at all.
As you probably know, there are other web servers (e.g., NGINX or Microsoft IIS) and databases (e.g., MariaDB) you can install Drupal on.
The database
Let's begin the installation of Drupal 8 by creating a database named d8basics with a utf8mb4 encoding (character set) and a utf8mb4_general_ci collation. If your site does not need this type of encoding (4-byte maximum length), then use a utf8 character set and a utf8_general_ci collation (3-byte maximum length).
To see a list of encodings supported by your version of MySQL or MariaDB, run the following command:
SHOW CHARACTER SET;

The utf8mb4 encoding is available as of MySQL 5.5.3 and it allows for emojis, asian symbols, mathematical symbols, etc.
To create the database, run the following command:
CREATE DATABASE d8basics CHARACTER SET utf8mb4 COLLATE utf8mb4_general_ci;

You can list all available databases by running the SHOW DATABASES command.
By running the previous command, each table and even every string column in the specified database will have both the utf8mb4 character set and the utf8mb4_general_ci collation.
Creating a new user to access the database
Now that the d8basics database is ready, let's create a new user and grant him/her the permissions to access the database.
For example, to create a new user named drupalhero for the d8basics database on localhost, run the following command:
USE d8basics;

CREATE USER drupalhero@localhost IDENTIFIED BY '123456';

To grant drupalhero proper permissions on the d8basics database, run the following command:
GRANT SELECT, INSERT, UPDATE, DELETE, CREATE, DROP, INDEX, ALTER, CREATE TEMPORARY TABLES ON d8basics.* TO 'drupalhero'@'localhost' IDENTIFIED BY '123456';

As you can guess, "123456" is the password for the user drupalhero.
The PHP.ini file
As you probably know, the php.ini file is responsible for configuring many of the aspects of the behaviour of PHP. In order to get a better performance, let’s modify a couple of configuration directives in this file.
1. Go to the Resource Limits section and extend the maximum execution time by setting the max_execution_time directive (maximum execution time of each script, in seconds) to a value of at least 60 (30 is the value by default). This may be useful to prevent the following error from occurring: “Fatal error: Maximum execution time of 30 seconds exceeded”.
2. In the same section, set the memory_limit directive (maximum amount of memory a script may consume) to a value of at least 256 (128 is the value by default).
3. Go to the bottom of the file and paste the following piece of code (OPcache) into it:
; PHP OPcode caching
[opcache]
zend_extension = php_opcache.dll
; Determines if Zend OPCache is enabled
opcache.enable = 1
4. Save all changes to the file.
The .htaccess file
Once you have decompressed the drupal-8-x-x.zip or druptal-8-x-x-tar.gz file into a subdirectory of the htdocs directory of Apache (the Web Server), do the following:
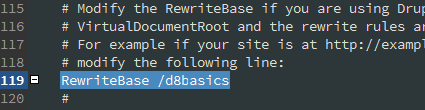
1. Open the .htaccess file and uncomment line 119.

2. If you have decompressed the file into a subdirectory named d8basics, then modify the RewriteBase like this:
RewriteBase /d8basics
3. Save all changes to the file.
Installing Drupal 8
Once the previous steps are done, start both servers (Apache and MySQL) and enter localhost/d8basics in the address bar of your favourite web browser.
Please, click on the image below to open a modal window with a video showing the end result of this article.